In this guide you will stream health data from Sahha to Convex using Sahha Webhooks and Convex HTTP Actions (TypeScript) — choosing which data types to send, verifying webhooks securely, and persisting structured events in a Convex table.
Prerequisites
Before you begin, make sure you have:
- Node.js 18+ installed
- A Convex account (free at convex.dev)
- Access to Data Delivery → Webhooks in the Sahha dashboard
Get data flowing into Sahha Required
Webhooks only fire when Sahha is actually receiving data. Choose how to connect:
Use the Sahha Demo App (fastest way to test)
- In the Sahha dashboard, go to Configure → Demo App
- Copy the Configuration URL (or scan the QR code)
- Install the Sahha Demo App from the App Store / Google Play
- In the demo app, paste the Configuration URL (or scan the QR) to connect it to your project
- Keep the demo app running so it can collect and submit device data
Once connected, you should see a new profile appear in your Sahha project and data beginning to flow.
If you’ve already integrated the Sahha SDK into your application, ensure that:
- Your app is successfully streaming data to Sahha
- You are setting a stable
externalIdwhen creating Sahha profiles (for example, your Convex user ID)
This externalId will later be sent back in webhooks as X-External-Id, which allows you to map Sahha events to the correct user in your database.
Set up your Convex project
Run npx convex dev to get started — a browser window will open for you to log in to your Convex account.
Download the starter project — it includes an HTTP Action with signature verification, a schema definition, and all project configuration already set up.
Download starter projectAfter downloading:
- Unzip and open the project
- Install dependencies:
cd sahha-convex-webhooks-starter
npm install- Start the Convex dev server:
npx convex devConvex will deploy your schema and functions automatically.
Create a new project
mkdir sahha-convex-webhooks
cd sahha-convex-webhooks
npm init -y
npm install convex
Initialize Convex
npx convex devThis creates a convex/ directory and links your project. Press Ctrl+C to stop the dev server for now — we’ll restart it after adding the files.
Create the schema
Create convex/schema.ts:
import { defineSchema, defineTable } from "convex/server";
import { v } from "convex/values";

export default defineSchema({
  sahhaEvents: defineTable({
    eventType: v.string(),
    externalId: v.string(),
    payload: v.any(),
    eventHash: v.string(),
    receivedAt: v.number(),
  })
    .index("by_event_hash", ["eventHash"])
    .index("by_external_id", ["externalId"])
    .index("by_event_type", ["eventType"]),
});
Create the webhook mutation
Create convex/webhooks.ts:
import { internalMutation } from "./_generated/server";
import { v } from "convex/values";

export const store = internalMutation({
  args: {
    eventType: v.string(),
    externalId: v.string(),
    payload: v.any(),
    eventHash: v.string(),
  },
  handler: async (ctx, args) => {
    const existing = await ctx.db
      .query("sahhaEvents")
      .withIndex("by_event_hash", (q) => q.eq("eventHash", args.eventHash))
      .first();

    if (existing) {
      return;
    }

    await ctx.db.insert("sahhaEvents", {
      ...args,
      receivedAt: Date.now(),
    });
  },
});
Create the HTTP action
Create convex/http.ts:
import { httpRouter } from "convex/server";
import { httpAction } from "./_generated/server";
import { internal } from "./_generated/api";

const encoder = new TextEncoder();

async function hmacSha256(
  secret: string,
  data: Uint8Array,
): Promise<string> {
  const key = await crypto.subtle.importKey(
    "raw",
    encoder.encode(secret),
    { name: "HMAC", hash: "SHA-256" },
    false,
    ["sign"],
  );
  const sig = await crypto.subtle.sign("HMAC", key, data);
  return [...new Uint8Array(sig)]
    .map((b) => b.toString(16).padStart(2, "0"))
    .join("");
}

async function sha256Hex(data: Uint8Array): Promise<string> {
  const hash = await crypto.subtle.digest("SHA-256", data);
  return [...new Uint8Array(hash)]
    .map((b) => b.toString(16).padStart(2, "0"))
    .join("");
}

const http = httpRouter();

http.route({
  path: "/sahha-webhook",
  method: "POST",
  handler: httpAction(async (ctx, request) => {
    try {
      const signature = (request.headers.get("x-signature") ?? "").trim();
      const eventType = (request.headers.get("x-event-type") ?? "").trim();
      const externalId = (request.headers.get("x-external-id") ?? "").trim();

      if (!signature) {
        return new Response("Missing X-Signature", { status: 400 });
      }

      const secret = process.env.SAHHA_WEBHOOK_SECRET ?? "";
      if (!secret) {
        return new Response("Missing SAHHA_WEBHOOK_SECRET", { status: 500 });
      }

      const rawBody = new Uint8Array(await request.arrayBuffer());

      const computed = await hmacSha256(secret, rawBody);
      if (computed !== signature) {
        return new Response("Invalid signature", { status: 401 });
      }

      const payload = JSON.parse(new TextDecoder().decode(rawBody));
      const eventHash = await sha256Hex(rawBody);

      await ctx.runMutation(internal.webhooks.store, {
        eventType: eventType || "unknown",
        externalId,
        payload,
        eventHash,
      });

      return new Response("ok", { status: 200 });
    } catch (err) {
      console.error("Webhook error:", err);
      return new Response("Server error", { status: 500 });
    }
  }),
});

export default http;
Now restart the dev server to deploy everything:
npx convex devDeploy and connect to Sahha
Store your webhook secret
Sahha signs every webhook request. Your HTTP Action must verify this signature.
- In Sahha, go to Data Delivery → Webhooks → Create webhook
- Copy the Secret value
Then in your terminal run:
npx convex env set SAHHA_WEBHOOK_SECRET your_secretReplace your_secret with the actual secret you copied from Sahha.
npx convex env list — you should see SAHHA_WEBHOOK_SECRET in the output. You can also check in the Convex dashboard → Settings → Environment Variables. Deploy to production
npx convex deployAfter deployment, your webhook endpoint URL is:
https://<deployment>.convex.site/sahha-webhook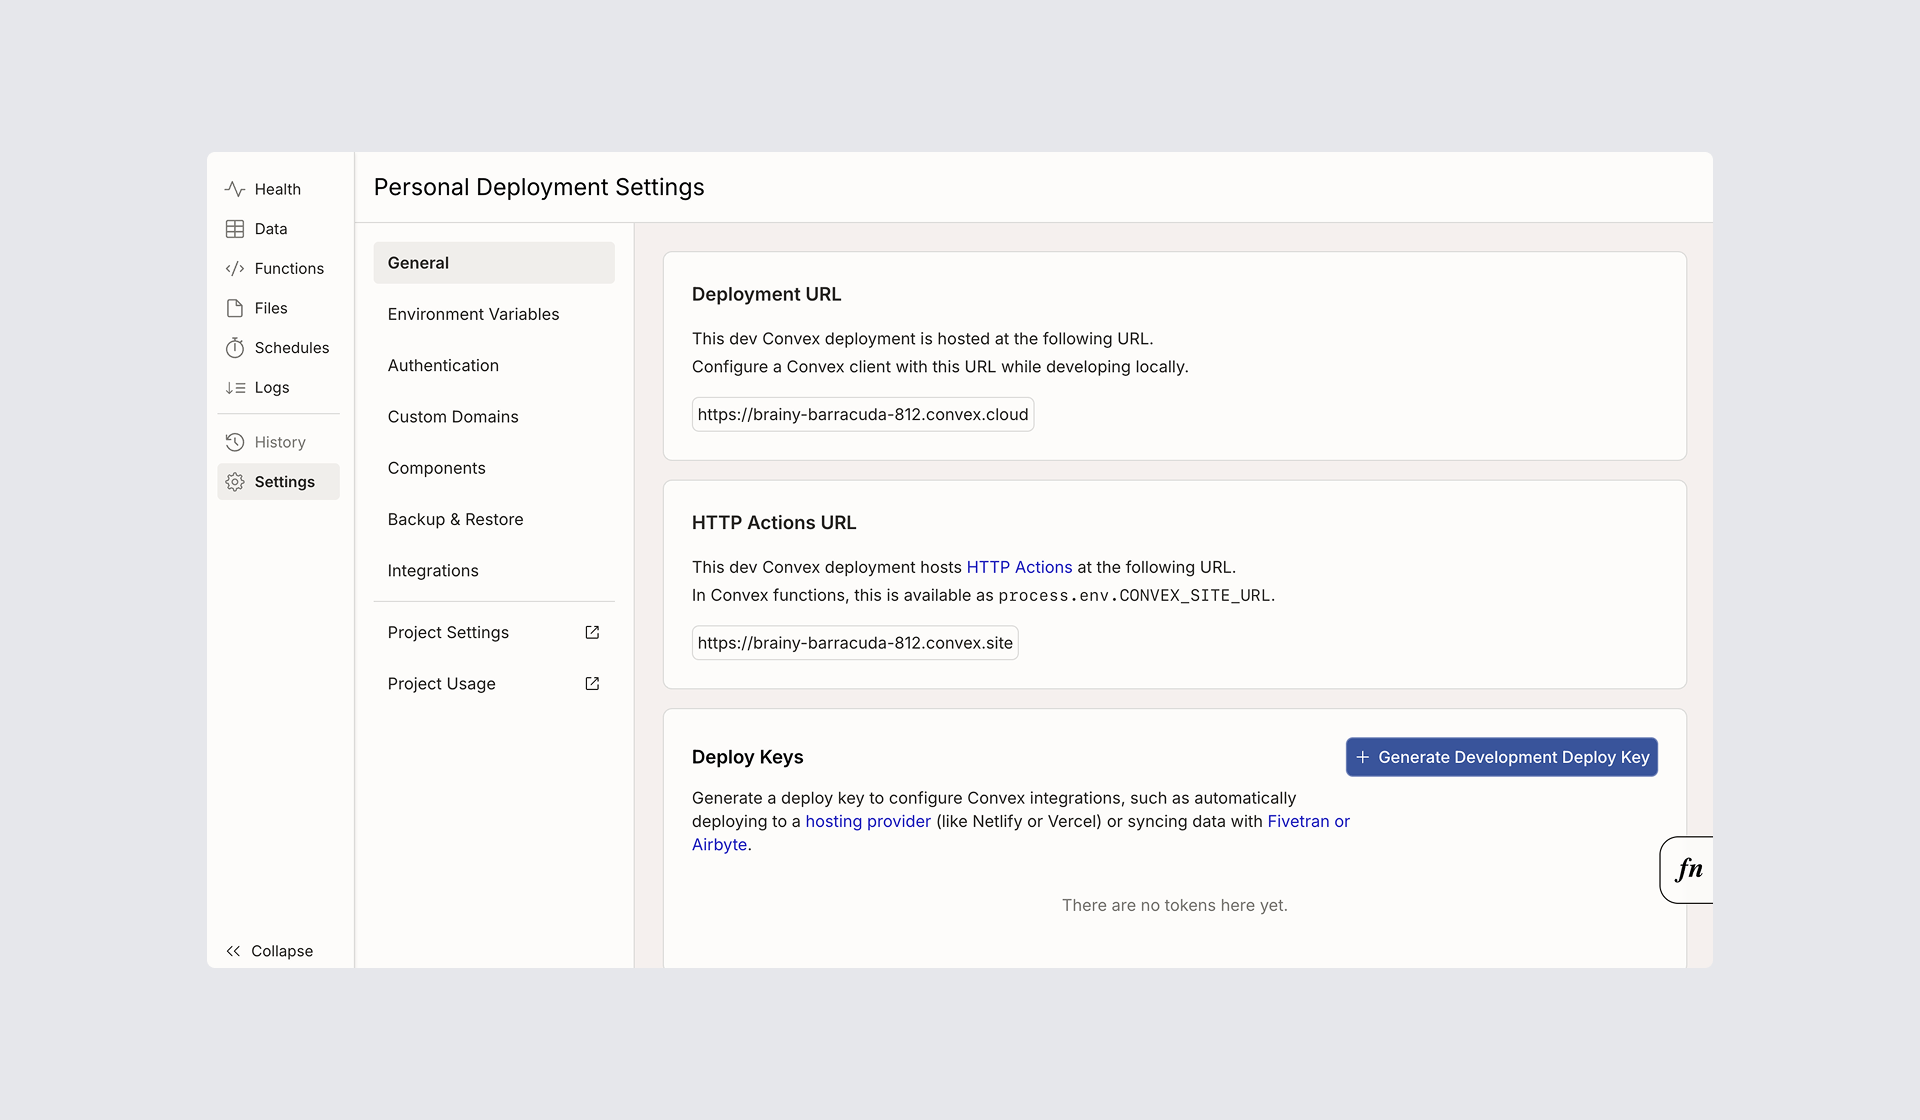
.convex.site URL for HTTP Actions — not the .convex.cloud URL. You can find the correct URL in the Convex dashboard → Settings → General → HTTP Actions URL. Convex gives you two deployments: Development (used by npx convex dev) and Production (used by npx convex deploy). Use your Development deployment URL while testing, then switch to your Production URL in the Sahha dashboard when you go live.
Configure Sahha
Go to Sahha Dashboard → Data Delivery → Webhooks → Create webhook and fill in:
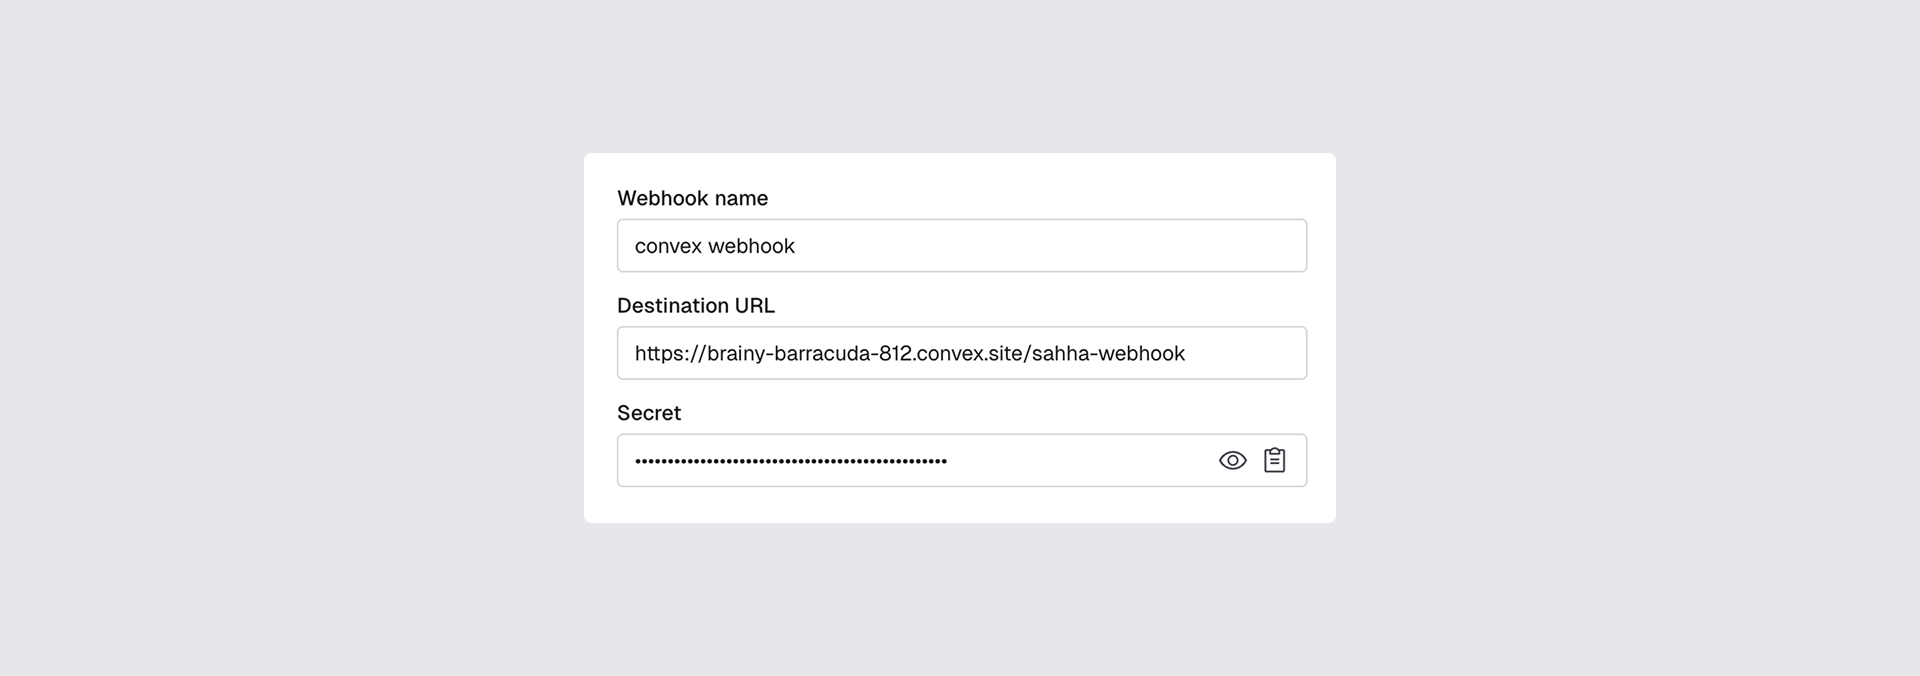
- Webhook name:
Convex Webhook - Destination URL: your Convex HTTP Action URL from above
- Event subscriptions: choose the data you want to stream — Health Scores, Biomarkers, Archetypes, Raw Data Logs
Click Create webhook.
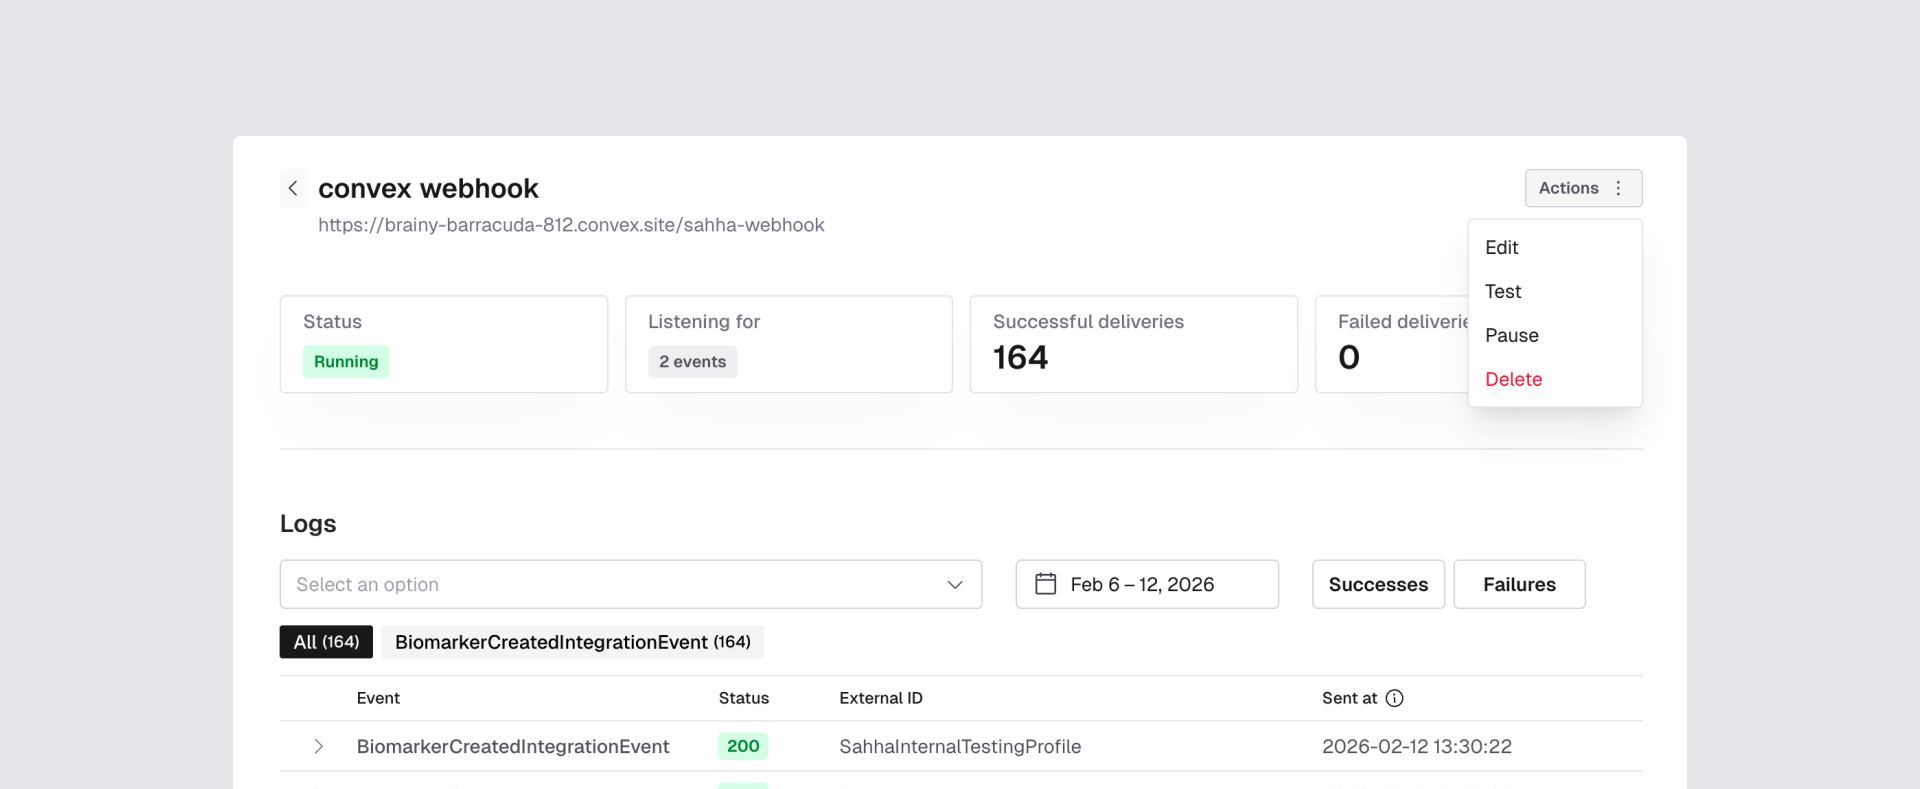
Test the webhook
In the Sahha dashboard, find your webhook and click Actions → Test. This sends a real signed test payload to your endpoint.
How data works in Convex
Events are stored in the sahhaEvents table with five fields: eventType, externalId, payload, eventHash, and receivedAt. Deduplication is handled transactionally — before each insert, the mutation queries the by_event_hash index and skips the write if the event already exists.
Here’s an example of a biomarker event payload that Sahha sends via webhook:
{
  "id": "1cb680dd-7e67-553c-9a29-c1bc066f6eb7",
  "type": "activity_low_intensity_duration",
  "unit": "minute",
  "value": "345",
  "version": 1,
  "category": "activity",
  "accountId": "4e9357a7-6275-4b22-b0f8-524962e4c7f7",
  "profileId": "b27fac52-0ae6-49d5-97c4-d720b7d6be16",
  "valueType": "long",
  "externalId": "SahhaInternalTestingProfile",
  "aggregation": "total",
  "endDateTime": "2026-02-11T23:59:59Z",
  "periodicity": "daily",
  "createdAtUtc": "2026-02-11T04:00:22.724731Z",
  "startDateTime": "2026-02-11T00:00:00Z"
}X-External-Id header with every webhook. Set this to your Convex user ID when creating Sahha profiles so you can map events back to the correct user in your database. Troubleshooting
Webhook requests aren't reaching Convex
Check:
- You deployed the functions to the correct Convex project (
npx convex deploy) - You copied the correct HTTP Action URL from the Convex dashboard
- Your Sahha webhook Destination URL matches that exact URL (ending in
/sahha-webhook)
401 Invalid signature
This means your secret in Convex does not match Sahha.
Fix:
npx convex env set SAHHA_WEBHOOK_SECRET your_secret
npx convex deploy
No data in the database
- Confirm Sahha is actually receiving data (Demo App or SDK active)
- Check function logs in the Convex dashboard → Logs
- Verify the environment variable is set: run
npx convex env list
Next steps
You now have a secure, production-ready Sahha webhook endpoint in Convex with automatic streaming into the Convex database.